A five-module review from the one chair in the building that assumes everything is broken until proven otherwise. Fair warning — I have never met a try/except: pass I liked, and I read release notes for fun.
There’s a particular kind of person who, when handed a shiny new AI course, immediately asks: “Yes, but can I reproduce it, and what happens when it fails at 2 a.m.?” That person does not get invited to many parties. That person is me, and this is my review.
DeepLearning.AI’s Agentic AI course walks you through five modules that build, brick by brick, from a single reflecting agent to a coordinated team of them: reflection → tool use → evaluation → multi-agent collaboration, all hung on one running example — a research-report agent — plus a rotating cast of standalone labs (chart bots, SQL bots, an email assistant, a sunglasses-store customer-service pipeline, a marketing team). Andrew Ng narrates. The slides are clean. The vibe is optimistic.
My job is to be the opposite of optimistic. So I studied every lecture PDF, ran a magnifying glass over every ungraded and graded lab, cracked open the autograders, and benchmarked the whole thing against what the rest of the field — Hugging Face’s Agents Course, LangGraph, CrewAI, AutoGen, Anthropic’s tool-use docs, LangSmith, DeepEval — teaches for the same money (which, for a lot of them, is zero).
The headline: as a set of ideas, this course is genuinely well-sequenced and honest. As a set of artifacts you might mistake for production code, it is a target-rich environment. The gap between those two sentences is the entire review.
| Mod | Topic | Rating | The one-line indictment |
|---|---|---|---|
| 1 | Reflective Research Agent | ★★★★★ (3.5/5) | Boots up, wipes its own audit trail on every restart. |
| 2 | Reflection Design Pattern | ★★★★★ (3.5/5) | Teaches you to ground self-critique — then never checks V2 beat V1. |
| 3 | Tool Use Design Pattern | ★★★★★ (3/5) | Hands an agent a hard delete and forbids it from asking permission. |
| 4 | Evaluating Agentic Workflows | ★★★★★ (2.5/5) | The evaluation module ships an autograder that evaluates nothing. |
| 5 | Multi-Agent Collaboration | ★★★★★ (3/5) | Best ideas, best lab — routed through a JSON parser held together with hope. |
git clone your way into an incident.
drop_all()The Reflective Research Agent
Most intro modules hand you a notebook and a warm feeling. Module 1 hands you a deployable FastAPI + Postgres app in a Docker container and says good luck. A planner (o4-mini, temperature=1) emits a 5–7 step plan; an executor routes each step to a research/writer/editor agent; the research agents call Tavily, arXiv, and Wikipedia; the result is persisted to Postgres and streamed to a UI. Shipping a real back end on day one is genuinely unusual — Hugging Face opens with one smolagents notebook; Microsoft’s “AI Agents for Beginners” is concept-first lessons. This throws you in the deep end of deployment, state, and orchestration immediately.
Which is exactly why the validation findings pile up so fast.
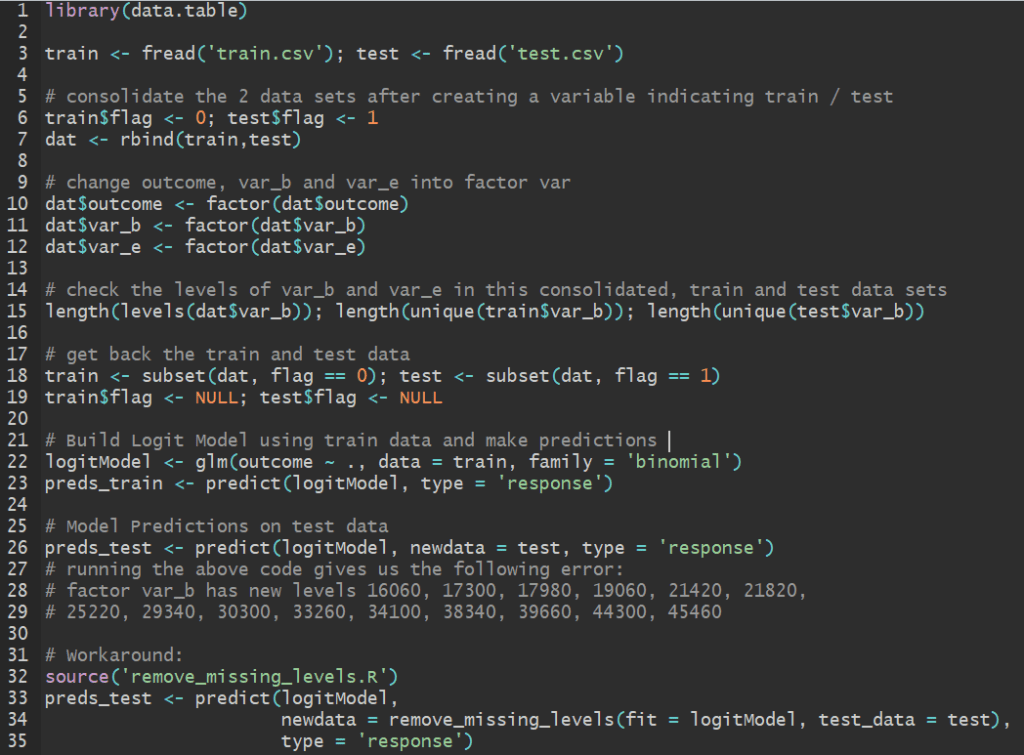
The signature crime is on main.py:49: an unconditional Base.metadata.drop_all() on every startup. Every restart nukes the tasks table — the audit trail, the one thing a validator actually lives for, has the persistence half-life of a container. The README documents this as a “gotcha” rather than fixing it, which is a very honest way of saying “we know.” Around it: dependencies that float free (2 of ~30 packages pinned, so two builds a week apart are two different models of reality); a research_agent that swallows exceptions and returns "[Model Error: ...]" as content the writer will then cheerfully cite; routing by substring match (if "research" in step_lower), so a step titled “Write up the research draft” routes to the research agent because “research” got checked first; allow_origins=["*"]; default Postgres creds on an exposed port; and LLM-authored raw HTML rendered into innerHTML with no sanitization — stored XSS waiting for the wrong search result.
What’s genuinely instructive is the shape: the clean planner/executor/agents/tools separation, a real multi-source tool loop, and a Docker one-shot that actually runs end to end. What’s dangerous is that it looks production-ready enough for someone to treat it that way.
data destruction on boot · silent error-as-content · unpinned deps · prompt-injection + XSS surface · open CORS + default creds · print()-only observability, zero tests.
Reflection Design Pattern
My priors on “the model critiques itself” are openly hostile, so I came in swinging. Module 2 mostly earned my grudging respect, because it stages the failure instead of hiding it.
The pattern is simple: emit V1, critique it, emit V2. The deck escalates through three grounding regimes — ungrounded self-reflection, execution feedback (run the code, feed back the stderr), and multimodal feedback (render the chart, let a vision model judge the actual pixels). Pleasingly, it doesn’t stop at “reflection good”: it cites Self-Refine (Madaan et al., 2023), then spends five slides on evaluation and explicitly warns about position bias in LLM-as-judge. Acknowledging that your evaluator is itself a biased instrument, in a beginner course, is more intellectual honesty than I budgeted for.
The star is the SQL lab (M2_UGL_2). It runs two reflection passes on a query over an event-sourced schema where qty_delta < 0 means a sale. The text-only refiner inspects the SQL, pronounces it fine, and confidently returns a negative total-sales number. Then the grounded refiner gets fed the actual result DataFrame, sees the nonsense, and fixes it with ABS(). That’s the whole model-validation lesson in one lab: self-reflection without an external oracle is theater.
Where it thins out is everything a validator asks next. No lab ever checks that V2 beat V1 — improvement is assumed, never measured. There’s no loop, no stopping criterion, no regression guard. The critic in the grounded SQL refiner runs at temperature=1.0 (a nondeterministic validator — a hard sell in any governed pipeline). And the graded assignment is the least trustworthy instance of the whole pattern: ungrounded essay critique, autograded only on “returns a str, no exception, length > 100.” You can pass with three near-identical three-line f-strings and never once observe whether reflection did anything. Defensible — free text can’t be autograded deterministically — but a cop-out all the same.
Versus the field: DLAI is more practical on the grounding distinction than most, but shallower on iteration — it never mentions Reflexion’s cross-trial memory, and LangGraph frames reflection as a stateful graph with loops and stopping edges. DLAI stops at V2; real systems iterate to convergence.
V2 > V1 never verified · graded task tests plumbing only · nondeterministic critic · no stopping criterion · unsandboxed exec() of LLM code. ● Redeeming grace: the SQL lab that stages the null result.
Tool Use Design Pattern
This is the module I actually lose sleep over, because tool use is the exact moment a text predictor acquires side effects on the world. The mechanics are taught cleanly — a tool is just code the LLM can request; here’s naive string-parsing, here’s the JSON function-calling contract, here’s multi-tool orchestration, here’s MCP as the m×n → m+n integration story. Two calling conventions (raw OpenAI vs. aisuite), which is realistic but plants the provider:model footgun ("gpt-4o" vs "openai:gpt-4o") that the README rightly flags as the #1 cause of silent NoneType has no attribute 'choices' failures.
And then the email lab (M3_UGL_2) hands the model a delete_email tool. I read the backend: email_service.py:194 is db.delete(email); db.commit() — a hard delete. No soft-delete, no trash, no tombstone; recovery means reseeding the fixture. Worse, the notebook’s own prompt instructs: “Never ask the user for confirmation before performing an action… (no human-in-the-loop).” The lab hard-codes the anti-pattern — full autonomy over a destructive verb — and then the closing cell congratulates you on building agents that act “safely and transparently.” It demonstrates transparency. It does not demonstrate safety, and conflating the two is precisely the trap a risk function exists to catch.
Elsewhere: web and arXiv content flows straight into the message history — a textbook indirect prompt-injection surface, never mentioned. Argument validation is fully delegated to the model (delete_email(email_id) trusts whatever integer the LLM hallucinates; no existence or ownership check). The autograder, despite the README claiming it “mocks the client,” actually calls your function live and asserts isinstance(out, str) and len(out) > 50 — 51 characters of lorem ipsum passes.
Credit where it’s due, and it’s real credit: auditability is the module’s genuine strength. The assignment forces you to hand-build the tool-response messages and retain the full history, and pretty_print_chat_completion renders the entire tool-call trace. You can reconstruct which tool fired with what arguments — the closest thing to a model-risk audit log in the whole course.
Versus the field, this is where DLAI trails hardest. Hugging Face names web-content injection as a memory-poisoning attack; Anthropic’s docs say “require confirmation for destructive operations”; LangGraph makes interrupt-on-destructive-action a first-class primitive. Module 3 teaches the literal opposite default and never shows the alternative exists.
destructive tool + no human-in-the-loop, taught as default · prompt-injection via tool output unmentioned · autograder asserts nothing · no argument/authorization validation. ● Redeeming graces: excellent trace auditability, error-as-data tool returns.
Evaluating Agentic Workflows
This is home turf, so naturally it’s the module I graded hardest. And here’s the twist: the framing is the best thing in the entire course. The 2×2 of objective-vs-judge crossed with ground-truth-vs-none is genuinely reusable pedagogy. Error analysis via traces — count which stage produces the bad output (search results 45%, source selection 10%…) and spend your budget there — is just attribution analysis, and it’s the right instinct. The evaluation-vs-reflection distinction the README draws (reflection fixes this run; evaluation is a reusable scorer that catches regressions across many runs) is exactly the offline-eval-as-regression-gate idea a validator wants to hear.
Then the labs show up and start filing exceptions against themselves.
LLM-as-judge is introduced and simply trusted — no calibration against human labels, no inter-rater agreement, no acknowledgement that a judge from the same model family as the generator is marking its own homework, no treatment of the scorer’s own non-determinism (same rubric, same input, different score — sampling noise cosplaying as a P&L improvement). “Trustworthy source” is operationalized as “URL host is on an allowlist,” which quietly swaps provenance for correctness — a well-sourced wrong answer scores a clean PASS, and arxiv.org is un-reviewed preprints. And the matching in the notebook students actually run is substring, not suffix (any(td in domain for td in TOP_DOMAINS)), so nature.com would happily trust nature.com.phishing.io. The utils.py next door does it correctly with endswith. The one they run does not.
The assignment is where it falls over completely. There’s no blank template to complete — only a filled-in submission.ipynb that’s almost entirely mocked, with TOP_DOMAINS = {} (an empty dict, so validation is structurally guaranteed to FAIL). And the connoisseur’s detail, the thing I could not have designed as satire: grader.py’s part_1 builds cases = [] and returns it. The autograder for the evaluation module evaluates nothing. The validator’s validator is a stub.
What a real validation function would demand and this omits entirely: a versioned held-out eval set, ground truth beyond a domain list, confidence intervals (n≈20 with no error bars is a vibe, not a measurement), human-calibration of the judge, drift monitoring, and trajectory-level metrics (τ-bench’s pass^k reliability, tool-call correctness). The field — LangSmith, DeepEval’s 14 metrics, Ragas, Phoenix — treats agent eval as the hard problem it is. Even DLAI’s own “Evaluating and Debugging Generative AI” goes deeper.
judge never validated · provenance ≠ correctness · spoofable substring matching · no statistics · reusable eval suite described but never built · assignment is a mocked skeleton · grader tests nothing.
Multi-Agent Collaboration
The capstone hands you an org chart: a team of specialized agents — planner, researcher, writer, editor — passing work down a line, coordinated by an executor that reads each plan step and routes it to whoever should do it. The slides are the most intellectually interesting of the course: linear pipelines, then all-to-all, then deeper hierarchies (manager → sub-teams → fact-checker → citation-checker). It’s a lovely tour. The labs only ever build the linear case. You’re shown the hard topologies and handed the easy one.
Here’s the number that belongs on slide one and isn’t: if each agent in a four-step chain is 90% reliable, the chain is 0.94 ≈ 66%. The entire selling point of multi-agent — decomposition — is also its central risk, because errors propagate and compound rather than cancel. The course never quantifies this, so a learner leaves thinking “more agents = more capability” when the validation reality is “more agents = more independent failure points in series.”
And the routing layer, the load-bearing wall of the whole design, is made of drywall. The executor_agent asks gpt-4o for “only a valid JSON object,” runs the reply through clean_json_block() — a regex that scrapes off Markdown code fences — and then calls a bare json.loads() with no try/except. The very existence of that fence-scraper is a confession that the model doesn’t reliably return clean JSON, so we bolt one on and pray. The day it emits a stray sentence or a trailing comma, the entire pipeline throws and dies mid-report. “Our orchestration layer deserializes free-text LLM output with no schema validation and no fallback” is not a design; it’s an incident with a pending date.
But — and this is real — M5_UGL_1 is the best-engineered lab in the entire course. A sunglasses-store customer-service pipeline with actual inventory/transactions tables in pandas + DuckDB, real tool functions, a planning step (request → JSON tool plan), a reflection step that repairs a flawed plan against a TOOLS-ONLY spec, and an error-explanation step that turns “this return would drive stock negative” into human guidance. It’s the closest the course comes to production shape. (It still explains the failure rather than preventing it with a rollback — but explaining it is more than most demos manage.) The campaign-team lab (M5_UGL_2) is the fun one — researcher → designer → copywriter → packager compiling an HTML report — but it’s a linear happy-path where every agent trusts its upstream blindly, with no evaluation gate between stages.
Versus the field, the comparison is almost unfair, because DeepLearning.AI has dedicated multi-agent courses — “Multi AI Agent Systems with crewAI,” “AI Agentic Design Patterns with AutoGen.” Against those, plus LangGraph’s stateful graphs with checkpoints and retries and OpenAI’s Agents SDK handoffs, this single capstone frames orchestration as a prompt-engineering problem solved with a hand-rolled JSON router, where the serious tools frame it as a reliability problem with real primitives. As a first exposure to the idea, it’s clear. As preparation to ship one, it’s a trailhead, not a map.
brittle json.loads router with no fallback · compounding failure never quantified · no transactional safety · blind hand-offs with no eval gate · autograder tests the parts, never the emergent team · observability = print().
The model validation sign-off
Let me total the ledger, because that’s the job.
What this course does well, and I mean genuinely well: the sequencing is excellent — reflection → tool use → evaluation → multi-agent is the right arc, and reusing one research-agent example across all five modules gives a continuity most course collections lack. The conceptual honesty is above market: Ng’s slides cite the real papers (Self-Refine), warn about LLM-judge position bias, draw the evaluation-vs-reflection line crisply, and never pretend “agentic” is a binary. Two labs — the execution-grounded SQL refiner (M2) and the DuckDB customer-service pipeline (M5) — are things I’d happily show a junior. The tool-call auditability in M3 is real. As a way to build the right mental models fast, it’s very good.
What a validation committee cannot sign: a recurring pattern where safety, reliability, and evaluation are treated as afterthoughts precisely in the modules about acting, and about evaluating. Autograders that certify “returns a string” and, in one delicious case, certify literally nothing. Code that wipes its own audit trail, deletes without confirmation, ingests untrusted content into its own context, routes on unschema’d JSON, and calls all of it “safe.” The course teaches you to start a system; it consistently declines to teach you to trust one.
Who should take it:
Final rating: 3/5 — and, in the spirit of a module that never checks whether V2 beat V1, I’ll note that I have not validated this rating against a held-out committee of human reviewers, calibrated my judge, or attached a confidence interval. Take it, appropriately, with external feedback.
Findings above. Remediation left as an exercise for the learner — which, to be fair, is the whole point of a course.
Reviewed against: DeepLearning.AI — Agentic AI, Hugging Face Agents Course, Anthropic tool-use docs, LangGraph human-in-the-loop, LangSmith, DeepEval, and the Self-Refine / Reflexion / τ-bench literature. Every code citation (main.py:49, email_service.py:194, TOP_DOMAINS = {}) was read in-repo, not inferred.

 ,
,
 is the
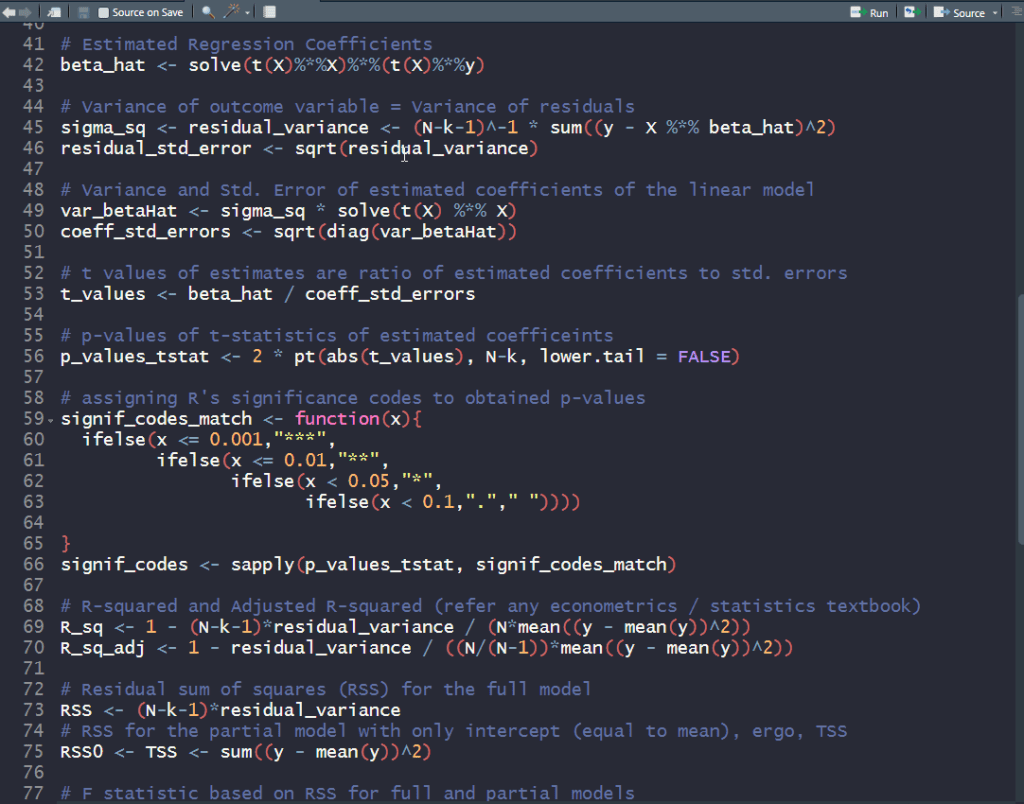
  outcome variable and
  is the
  data matrix of independent predictor variables (including a vector of ones corresponding to the intercept). The ordinary least squares (OLS) estimate for the vector of coefficients
  is:
is:


 and with these, one can compute the t-statistics and their corresponding p-values.
 – for the full model with all predictors
 – for the partial model (
![\mathbf{y} = \mathbf{\mu} + \mathbf{\nu}; \mathbf{\mu} = \mathop{\mathbb{E}}[\mathbf{y}]; \mathbf{\nu} \sim N(0, \sigma_0^2 \mathbf{I})](https://s0.wp.com/latex.php?latex=%5Cmathbf%7By%7D+%3D+%5Cmathbf%7B%5Cmu%7D+%2B+%5Cmathbf%7B%5Cnu%7D%3B+%5Cmathbf%7B%5Cmu%7D+%3D+%5Cmathop%7B%5Cmathbb%7BE%7D%7D%5B%5Cmathbf%7By%7D%5D%3B+%5Cmathbf%7B%5Cnu%7D+%5Csim+N%280%2C+%5Csigma_0%5E2+%5Cmathbf%7BI%7D%29+&bg=ffffff&fg=000&s=1&c=20201002) ) with the outcome observed mean as estimated outcome
) with the outcome observed mean as estimated outcome