Properly Uninstalling Canopy Python Installation from Linux

Motivation for this blog post:

I had downloaded Canopy at the insistence of the instructors of MIT’s introductory course on computer science using Python. That said, I rarely ever used it. I’ve all along been working on Python using a text editor and command line only. I also downloaded Anaconda and started working on IPython since I began working on a new machine learning MOOC offered by the University of Washington via Coursera. Anaconda is awesome! It has all the best scientific libraries and I love IPython compared to PyCharm or Canopy, which pale in comparison to IPython, especially if you’re using Python for Machine Learning.

Anyway, I was working on IPython, trying to import matplotlib, when I got the following ImportError:

ImportError in importing matplotlib in IPython notebook

I noticed that the matplotlib library was trying to be accessed in Canopy’s Enthought directory. Since I never used or liked Canopy anyway, I decided to uninstall, bitch!

Step by step process of uninstalling Canopy from Linux:

1) From the Canopy preferences option in the Edit menu, mark off Canopy as your default Python (this step is not available on very early versions of Canopy).

2) Restart your computer.

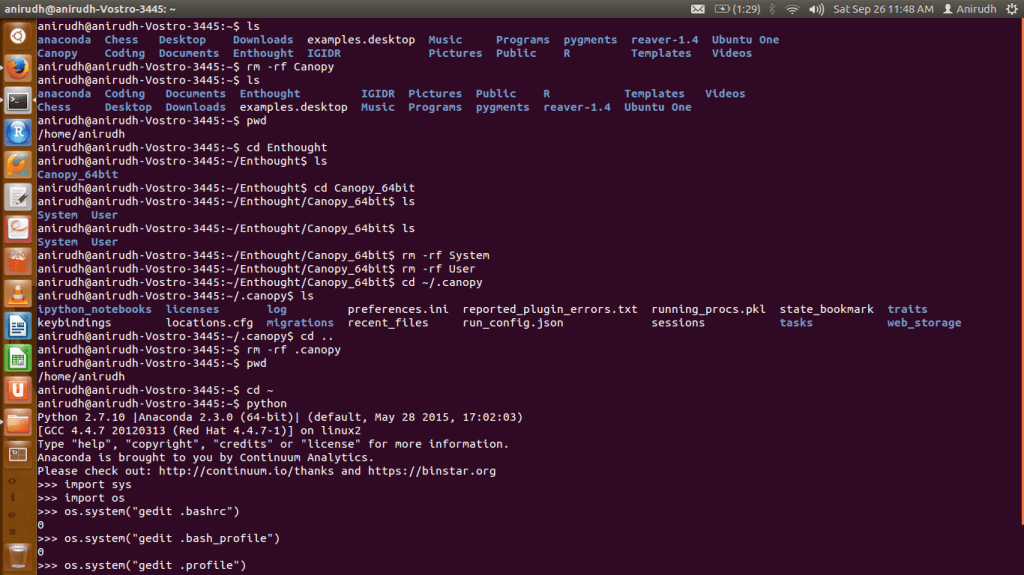
3) Remove the “~/Canopy” directory (or the directory where you installed Canopy).
rm -rf Canopy

4) For each Canopy user, delete one or more of the directories below, which contain that user’s “System” and “User” virtual environments, and any user macros.

  • Deleting “System” removes the environment where the Canopy GUI application runs; it will be re-created the next time that you start Canopy.
  • Deleting “User” removes all your installed Python packages; it will be re-created with only the packages bundled into the Canopy installer, the next time that you start Canopy.
  • Deleting the third directory will remove any Canopy macros which you may have written. It is usually empty. I did this from the desktop home directory itself.

(for 32-bit Canopy, replace “64bit” with “32bit”):

~/Enthought/Canopy_64bit/System
~/Enthought/Canopy_64bit/User
~/canopy

For a 64 bit system:
cd Enthought/Canopy_64bit

for a 32 bit system:
cd Enthought/Canopy_32bit

rm -rf System
rm -rf User

5) Delete the file “locations.cfg” from each user’s Canopy configuration / preferences directory. For complete Canopy removal, delete this directory entirely; if you do so, the user will lose individual preferences such as fonts, bookmarks, and recent file list.

cd ~/.canopy
cd ..
rm -rf .canopy

6) If you are uninstalling completely, edit the following files to delete any lines which reference Canopy (usually, the Canopy-related lines will have been commented out by step 1 but on some system configurations the lines might remain):

For this step, refer to my blog post on opening files in a text editor from the CMD / Terminal (Using Python).

~/.bashrc
~/.bash_profile
~/.profile

7) Restart your computer.

All these steps in one:

Screenshot from 2015-09-26 11:48:43

Once I was done with these steps, I no longer encountered any issues importing matplotlib on IPython anymore.

Screenshot from 2015-09-26 12:06:47

Advertisement

Scatter Plot Bug Fix in Dato’s GraphLab Create ML Package in Python

I have been using Dato’s GraphLab Create for Coursera’s new Machine Learning Specialization that uses Python. Like me, if you’ve been facing trouble obtaining scatter plots on your canvas in GraphLab Create despite the following code:

graphlab.canvas.set_target('ipynb')

…then no worries, there is a quick fix. I’ve been deliberately lousy with the presentation, so sorry about that. Chances are that no one’s going to end up reading this anyway. I saw this problem being discussed on a Dato forum, so I decided to blog about the fix.

EDIT: Note that this problem is in GraphLab Create v1.6 only. They came up with v1.6.1 a few days after the problem was escalated on their forum, so a good option would be to upgrade GraphLab Create.

The problem you face should looks something like this (click images below to enlarge):Screenshot from 2015-09-25 14:10:20

To solve the problem:

Locate sframe.py from your home directory by searching for it from your desktop environment (applies to Windows users too). I found it in the following path on my computer:

~/anaconda/lib/python2.7/site-packages/graphlab/canvas/views

The file sframe.py should look like this:

Screenshot from 2015-09-25 15:49:44

Then replace the code in lines 255-227 of the opened .py file with the code highlighted below:

Screenshot from 2015-09-25 15:53:19

This should take care of the problem for good.

Now you have your desired result:

Screenshot from 2015-09-25 16:18:41

Upgrading R / Installing R-3.2.0 on Ubuntu

Till recently, I was using R-3.1.1 on Windows OS. Then on April 16, 2015 (10 days ago), they released R-3.2.0. Upgrading it on Windows was easy peasy, not like the headache Ubuntu gave me.

I recently got a Dell Vostro 14 3000 series laptop with Ubuntu 12.04 installed. I haven’t yet upgraded to Ubuntu 14.04 because the graphics drivers for this computer aren’t available for that version. Besides, I’m not much of a gamer. If I were, I wouldn’t care for Ubuntu!

Anyway, I tried installing by typing the following on Terminal:

 sudo apt-get update  
 sudo apt-get install r-base r-base-dev  

R did get installed, but not the latest version. A much older version R-2.14.1. I later found out after quite a lot of time spent on StackExchange, that I had to choose a CRAN mirror that was geographically close to my computer, which would then act as a “software source” for the latest version of R. Now that explained why the above sudo commands weren’t getting me the desired version of software. It was because the the Ubuntu / Canonical software repositories only had an older R version. Also, the distribution line had to match the codename of my Ubuntu version (12.04 LTS).

 codename=$(lsb_release -c -s)  
 echo "deb http://ftp.iitm.ac.in/cran/bin/linux/ubuntu $codename/" | sudo tee -a /etc/apt/sources.list > /dev/null  

Note that instead of http://ftp.iitm.ac.in/cran one must replace it with the geographically closest CRAN mirror. Also, the Ubuntu archives on CRAN are signed with the key of Michael Rutter <marutter@gmail> with key ID E084DAB9. So we type in the following:

 sudo apt-key adv --keyserver keyserver.ubuntu.com --recv-keys E084DAB9  
 sudo add-apt-repository ppa:marutter/rdev

Followed by what we would normally have done:

 sudo apt-get update  
 sudo apt-get upgrade  
 sudo apt-get install r-base r-base-dev  

This did the job for me, and I had R-3.2.0 installed successfully on my Ubuntu system. Compare this to Windows, where all you have to do is type in 3 lines (in R, and not Shell):

install.packages("installr")  
library(installr)  
updateR()

And to think I left Windows for Linux! I am a Linux newb, and God only knows why I wanted to try out Linux, but on giving it some thought, I think I know why


source: https://xkcd.com/456/ and http://xkcd.com/149/